Tiling
Assembly for Annotation-independent Novel Gene Discovery
By Jennifer Lopez and Kenneth Watanabe
Last edited on September 7, 2015 by Kenneth Watanabe
The following procedure explains how to run the
Tiling Assembly (TA) on RNA-seq data to identify genes of an organism.
Short
read alignment
Before TA can be run, the short read the RNA-seq
short read data must be aligned to the genome. The following examples will
demonstrate how to align the data using the Tophat alignment software. To run
Tophat, enter the following command at the LINUX prompt:
$ tophat –o <tophat_dir> -I 50000 –p 6
<index_file> <fastq_file1>,<fastq_file2>,<fastq_file3>
where <tophat_dir> is the output directory, -I
50000 specifies a maximum intron length of 50,000bp, index_file is the indexed
genome file generated by bowtie2build, and fastq_filex are the FASTQ RNA-seq
files.
Tophat will generate a file called junctions.bed.
This is a human-readable text file that contains the junction information
identified from the short read data. This data will be used to identify
introns.
Tophat will also generate an alignment file called
accepted_hits.bam. This file is in a non-human-readable format and cannot be
used by the Tiling Algorithm in its current form. The data needs to be
converted to a sam file and loaded into a database table.
To convert a bam file to a human readable sam file,
we use the samtools software. To convert
the accepted_hits.bam file to a sam file use the following command:
$ samtools view accepted_hits.bam > accepted_hits.sam
A database table must be created in MySQL to store the
short read data. The table can be created either by using MySQL commands or by
Navicat. Below is a description to create tables via MySQL. To create tables
using Navicat, please refer to the Navicat documentation.
Creating
database tables via MySQL:
Next, the data needs to be stored into a database
table so that TA can rapidly scan through the data. Log onto your server and
enter the following command
$ mysql –u <mysql_user_name> –p
Enter password: <password>
Connect to the database that you wish to store the
data by entering the following command at the MySQL prompt:
MySQL> connect <database>;
To create a short read
table, use the “CREATE TABLE” command as described in the appendix of this
document.
If you already have a
short read table and wish to create a new table using the existing table as a
template, you can enter the following command:
MySQL> create table short_reads_test6_sam like short_reads_sam;
The above example will
create a table called “short_reads_test6_sam” that has the same column
definitions as short_reads_sam. The actual data in short_reads_sam table will
NOT be copied to short_reads_sam1.
A MySQL interface
program such as Navicat can also be used to create the database table.
Next the junctions and
junction_ends tables must be created to store the junction information in the
junctions.bed file. MySQL commands can be used to create the tables similar to
how the short reads table was created. Examples of the commands used to create
these tables in the appendix of this document.
If you already have a
junctions and junction_ends table, you can make a copy of the tables using
these tables as a template. The following commands show how to create the
tables junctions1 and junction_ends1 using the junctions and junction_ends
tables as templates.
mysql> create table junctions1 like junctions;
mysql> create table junction_ends1 like junction_ends;
Loading the data into the MySQL
database
Create a subdirectory
under your home directory called “perl”. Transfer all PERL scripts into this
directory. It is necessary that all the TA software resides in the same
directory. Before running the TA software, you must edit the connDB.pl script
and enter the username and password of a valid MySQL account that has access to
the short_read table created in the previous section.
The first module of the
TA software is the “load_sam_file.pl” script. This script loads the sam file
into a selected table. Below is a screen shot of the load_sam_file script. When
running the load_sam_file.pl script, the following window will appear. Enter
the sam file into the “File name” prompt. Enter the database name and table
name to store the sam file. The “Sample Type” and “Sample Name” fields were
added so that multiple sam files can be loaded into the same table and the data
can be distinguished. E.g. Sample Type: Control; Sample Name: Replicate1.
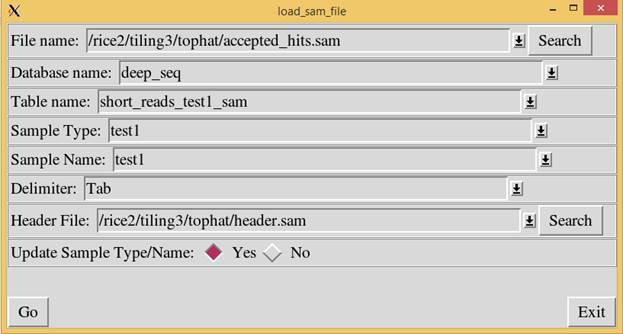
The header file is a
file with the field names. This file tells the load_sam_file.pl script the
field names in the database. A default header.sam file is included with the TA
software.
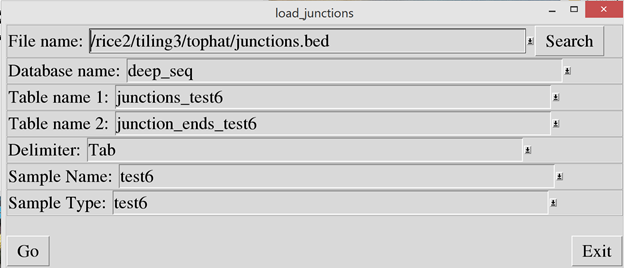
The junctions.bed file
created by Tophat must now be loaded into the junctions and junction_ends
tables. To do this, run the“load_junctions.pl” script. In the “File name”
prompt, enter the junctions.bed file.
Running the Tiling Assembly
software
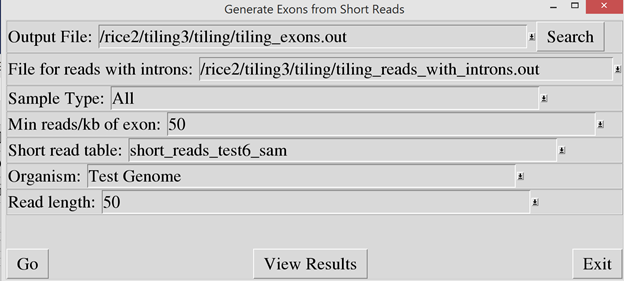
Then the “exon_builder2.pl” script must be run to scan
the short read data and identify the exons based on the overlapping reads. In
the “Output File” prompt, enter the name of the output file. Since some of the
reads mapped across junctions, these reads will be saved into a separate output
file. Enter the output file for these reads into the “File for reads with
introns” prompt. In the “Short read table”, enter the same table name used in
the load_sam_file script.
Note: An organism must be specified so that the
Tiling Assembly can determine the number of chromosomes and their names.
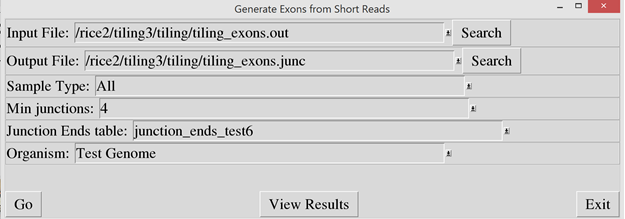
Then run
“exons_from_junctions.pl” script to identify short exons from the junction
data. In the “Input File” prompt, enter the output filename that was used in
the exon_builder2 script. In the “Output File” prompt, enter a file name to
store the resulting exon data.
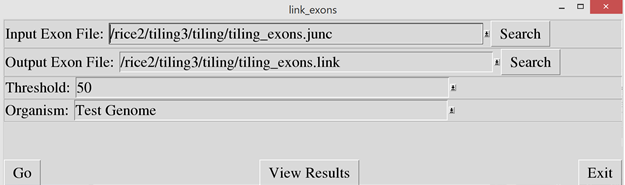
Then run the “link_exons.pl”
script to link exons together that are closely spaced. If two exons are closer
than the specified threshold, they are combined into a single exon. In the
“Input Exon File”, enter the output file name from the exons_from_junctions
script. In the “Output File” prompt, enter a file name to store the resulting
exon data.
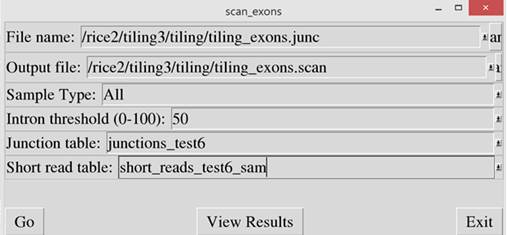
Then run “scan_exons.pl” script to identify exons
that have been mistakenly linked together due to noise or via the link_exons
script. If a junction is identified
within an exon and the reads aligned on the intron are less than the intron
threshold, compared to the adjacent regions, it is considered an intron and the
exon is split. If not, the junction is ignored. In
the “Input Exon File”, enter the output file name from the link_exons script.
In the “Output File” prompt, enter a file name to store the resulting exon
data.
This step may take a long time depending on the
number of records in the short read table.
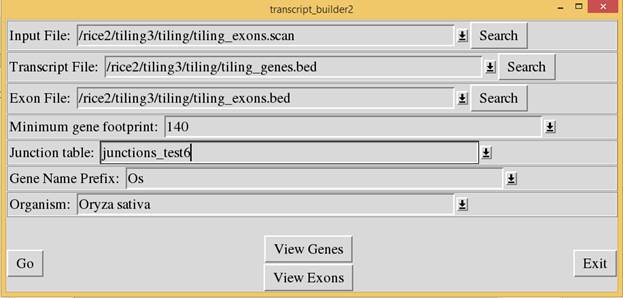
Then run “transcript
builder2.pl” script to assemble the exons into transcripts based on the
junction alignment. In the “Input File” prompt, enter the output file used in
the scan_exons script. In the “Transcript File” and “Exon File” prompts, enter
the file names to store the transcript and exon data. The output files will be
in bed format. In the “Minimum gene footprint” prompt, enter the minimum
footprint (in nucleotides) necessary for consideration as a gene. Any
identified gene with a footprint less than this value will be disregarded. All
gene names will be prefixed by the value entered in the “Gene Name Prefix”
field. In the “Organism” field, enter the organism name from the pull-down so
that the program will know the name and number of chromosomes.
The “Transcript File”
and “Exon File” are the final results of the Tiling Algorithm. These files can
be loaded into a genome browser such as the UCSC Genome Browser for viewing.
Appendix
To create a table to
store the short read data, enter the following command after logging into
MySQL. This will create a table called short_reads_sam.
CREATE TABLE `short_reads_sam` (
`read_id` varchar(40)
NOT NULL DEFAULT '',
`flag` varchar(10)
DEFAULT NULL,
`chromosome` varchar(5)
NOT NULL DEFAULT '',
`start_position` int(11)
NOT NULL DEFAULT '0',
`map_quality`
varchar(10) DEFAULT NULL,
`cigar` varchar(40)
DEFAULT NULL,
`rnext` varchar(10)
DEFAULT NULL,
`pnext` varchar(10)
DEFAULT NULL,
`tlen` varchar(10)
DEFAULT NULL,
`sequence` varchar(100)
DEFAULT NULL,
`quality` varchar(100)
DEFAULT NULL,
`attribute1` varchar(20)
DEFAULT NULL,
`attribute2` varchar(20)
DEFAULT NULL,
`attribute3` varchar(20)
DEFAULT NULL,
`attribute4` varchar(20)
DEFAULT NULL,
`attribute5` varchar(20)
DEFAULT NULL,
`attribute6` varchar(20)
DEFAULT NULL,
`attribute7` varchar(20)
DEFAULT NULL,
`attribute8` varchar(20)
DEFAULT NULL,
`attribute9` varchar(20)
DEFAULT NULL,
`attribute10`
varchar(20) DEFAULT NULL,
`sample_name` text NOT
NULL,
`sample_type` text NOT
NULL,
`end_position` int(11) DEFAULT
NULL,
KEY `chrom_start_pos`
(`chromosome`,`start_position`) USING BTREE,
KEY `samp_name`
(`sample_name`(10)) USING BTREE,
KEY `samp_type`
(`sample_type`(10)) USING BTREE
);
To create tables to
store the junction information, use the following commands after logging into
MySQL.
CREATE TABLE `junctions` (
`junction_name` text NOT
NULL,
`chromosome` text NOT
NULL,
`start_pos` int(11) NOT
NULL DEFAULT '0',
`end_pos` int(11) NOT
NULL DEFAULT '0',
`number` int(11) DEFAULT
NULL,
`strand` text DEFAULT
NULL,
`sample_type` text NOT
NULL,
`sample_name` text NOT
NULL,
`left_side` int(11)
DEFAULT NULL,
`right_side` int(11)
DEFAULT NULL,
`intron_start` int(11)
DEFAULT NULL,
`intron_end` int(11)
DEFAULT NULL,
PRIMARY KEY (`junction_name`(20),`chromosome`(5),`start_pos`,`sample_type`(10),`sample_name`(10),`intron_start`),
KEY `chrom`
(`chromosome`(5)) USING HASH,
KEY `start_pos`
(`start_pos`) USING BTREE,
KEY `intron_start_index`
(`intron_start`)
);
CREATE TABLE `junction_ends` (
`junction_name` text NOT
NULL,
`chromosome` text NOT
NULL,
`start_pos` int(11) NOT
NULL DEFAULT '0',
`end_pos` int(11) NOT
NULL DEFAULT '0',
`number` int(11) DEFAULT
NULL,
`strand` text DEFAULT
NULL,
`sample_type` text NOT
NULL,
`sample_name` text NOT
NULL,
`side` int(11) DEFAULT
NULL,
PRIMARY KEY
(`junction_name`(20),`chromosome`(5),`start_pos`,`sample_type`(10),`sample_name`(10)),
KEY `chrom`
(`chromosome`(5)) USING HASH,
KEY `start_pos`
(`start_pos`) USING BTREE
);